mirror of
https://github.com/garronej/ts-ci.git
synced 2025-11-30 21:43:05 +00:00
359 lines
15 KiB
Markdown
359 lines
15 KiB
Markdown
<p align="center">
|
|
<img src="https://user-images.githubusercontent.com/6702424/82094662-cd17c200-96fd-11ea-8645-808344bad951.png">
|
|
</p>
|
|
<p align="center">
|
|
<i> A template to assist you in creating and publishing TypeScript modules.</i>
|
|
<br>
|
|
<br>
|
|
</p>
|
|
|
|
---
|
|
|
|
# Presentation
|
|
|
|
This template automates the boring and tedious tasks of:
|
|
- Filling up the ``package.json``
|
|
- Setting up Typescript.
|
|
- Writing a [README.md](https://github.com/garronej/ts_ci/blob/master/README.template.md) with decent presentation and instructions on how to install/import your module.
|
|
- Testing on multiple Node version before publishing.
|
|
- Maintaining a CHANGELOG.
|
|
- Publishing on NPM and creating corresponding GitHub releases.
|
|
|
|
Besides, good stuff that comes with using this template:
|
|
- No dist files are tracked on the ``master`` branch.
|
|
- Shorter specific file import path.
|
|
``import {...} from "my_module/theFile"`` instead of the usual
|
|
``import {...} from "my_module/dist/theFile"``
|
|
- CDN distribution for importing from an ``.html`` file with a ``<script>`` tag.
|
|
- A branch ``latest`` always in sync with the latest release.
|
|
- When your users hit *"Go to Definition"* they get redirected to the actual ``.ts`` source file instead of the ``.d.ts``.
|
|
( Feature disabled by default, refer to [instructions](#enabling-go-to-definition-to-redirect-to-the-source-ts-file) on how to enable it ).
|
|
- Eslint and Prettifier are automatically run against files staged for commit. ( You can [disable](#disable-linting-and-formatting) this feature. )
|
|
|
|
|
|
If you want your module to support Deno as well checkout [denoify_ci](https://github.com/garronej/denoify_ci).
|
|
|
|
# Table of content
|
|
|
|
- [How to use](#how-to-use)
|
|
- [Fork it ( click use the template )](#fork-it--click-use-the-template-)
|
|
- [Enable automatic publishing](#enable-automatic-publishing)
|
|
- [Few things you need to be aware of before getting started](#few-things-you-need-to-be-aware-of-before-getting-started)
|
|
- [Customization:](#customization)
|
|
- [Changing the directories structure](#changing-the-directories-structure)
|
|
- [Enabling "Go to Definition" to redirect to the source ``.ts`` file](#enabling-go-to-definition-to-redirect-to-the-source-ts-file)
|
|
- [Swipe the image in the ``README.md``](#swipe-the-image-in-the-readmemd)
|
|
- [Disable linting and formatting](#disable-linting-and-formatting)
|
|
- [Disable Prettier](#disable-prettier)
|
|
- [Disable Eslint and Prettier altogether](#disable-eslint-and-prettier-altogether)
|
|
- [Disable CDN build](#disable-cdn-build)
|
|
- [Completely disable](#completely-disable)
|
|
- [Only disable ES Module build ( ``dist/zz_esm/*`` )](#only-disable-es-module-build--distzz_esm-)
|
|
- [Remove unwanted dev dependencies](#remove-unwanted-dev-dependencies)
|
|
- [Customizing the Badges](#customizing-the-badges)
|
|
- [Accessing files outside the ``dist/`` directory](#accessing-files-outside-the-dist-directory)
|
|
- [The automatically updated ``CHANGELOG.md``](#the-automatically-updated-changelogmd)
|
|
- [Video demo](#video-demo)
|
|
- [Examples of auto-generated readme](#examples-of-auto-generated-readme)
|
|
- [Creating a documentation website for your project](#creating-a-documentation-website-for-your-project)
|
|
- [Creating a landing page for your project](#creating-a-landing-page-for-your-project)
|
|
|
|
# How to use
|
|
|
|
## Fork it ( click use the template )
|
|
|
|
- Click on *Use this template*
|
|
- The repo name you will choose will be used as a module name for NPM so:
|
|
- Be sure it makes for a valid NPM module name.
|
|
- Check if there is not already a NPM module named like that.
|
|
- The description you provide will be the one used on NPM and in ``package.json`` ( you can change it later )
|
|
|
|
Once you've done that a GitHub action workflow will set up the ``README.md`` and the ``package.json`` for you, wait a couple of minutes for it to complete ( a bot will push ). You can follow the job advancement in the "Action" tab.
|
|
|
|
Each time you will push changes ``npm test`` will be run on remote docker containers against multiple node versions if everything passes you will get a green ``ci`` badges in your readme.
|
|
|
|
## Enable automatic publishing
|
|
|
|
Once you are ready to make your package available on NPM you
|
|
will need to provide two tokens so that the workflow can publish on your behalf:
|
|
|
|
Go to repository ``Settings`` tab, then ``Secrets`` you will need to add two new secrets:
|
|
- ``NPM_TOKEN``, you NPM authorization token.
|
|
- ``PAT``, GitHub **P**ersonal **A**ccess **T**oken with the **repo** authorization. [link](https://github.com/settings/tokens)
|
|
|
|
To trigger publishing edit the ``package.json`` ``version`` field ( ``0.0.0``-> ``0.0.1`` for example) then push changes... that's all !
|
|
The publishing will actually be performed only if ``npm test`` passes.
|
|
|
|
# Few things you need to be aware of before getting started
|
|
|
|
- You probably want to "Use this template" ( the green button ) instead of forking the repo.
|
|
- The files to include in the NPM bundle are cherry-picked using the ``package.json`` ``files`` field.
|
|
If you don't want to bother and includes everything just remove the ``files`` field from the ``package.json``
|
|
otherwise remember, when you add a subdirectory in ``src/``, to update the ``package.json`` ``files``.
|
|
- If you are going to programmatically load files outside of the ``dis/`` directory ( like the ``package.json`` or files inside ``res/`` ) be mindful that the paths might not be the one you expect. [Details](#accessing-files-outside-the-dist-directory).
|
|
- The template does not support ``.npmignore`` ( it use the safer ``package.json`` ``files`` instead ).
|
|
- The template does not support ``.npmrc``.
|
|
- In rare occasions the workflow in charge of performing the initial configuration does not fire up.
|
|
If it is the case for you please delete the repo you just created and start over again.
|
|
|
|
# Customization:
|
|
|
|
## Changing the directories structure
|
|
|
|
All your source files must remain inside the ``src`` dir, you can change how things are organized inside the source directory
|
|
but don't forget to update your ``package.json`` ``main``, ``type`` and ``files`` fields and ``tsconfig.esm.json`` ``include`` field when appropriate.
|
|
|
|
## Enabling "Go to Definition" to redirect to the source ``.ts`` file
|
|
|
|
There is no denying that it is more convenient when clicking "Go To Definition" to get redirected to
|
|
a file ``.ts`` file rather than to a ``.d.ts``.
|
|
|
|
To enable this feature simply point to the ``package.json``'s ``types`` filed to the ``main``'s source
|
|
file instead the type definition file ``.d.ts``.
|
|
|
|
For example you would replace:
|
|
|
|
```json
|
|
{
|
|
"main": "./dist/index.js",
|
|
"types": "./dist/index.d.ts",
|
|
}
|
|
```
|
|
|
|
by:
|
|
|
|
```json
|
|
{
|
|
"main": "./dist/index.js",
|
|
"types": "./src/index.ts",
|
|
}
|
|
```
|
|
|
|
Enabling this feature comes at a cost though. Be aware that if you use [optional chaining](https://www.typescriptlang.org/docs/handbook/release-notes/typescript-3-7.html#optional-chaining) or [nullish coalescing](https://www.typescriptlang.org/docs/handbook/release-notes/typescript-3-7.html#nullish-coalescing) for example, your module will only be importable
|
|
in projects using typescript 3.7 or newer ( version that introduces theses features ).
|
|
It is important to keep your project compatible with older TS version because
|
|
- You don't want to force your users to update the typescript version they use in their project,
|
|
updating typescript might break some other things in their code.
|
|
- In certain environments updating TypeScript is not an option. Take [Stackblitz](https://stackblitz.com)
|
|
for example.
|
|
|
|
## Swipe the image in the ``README.md``
|
|
|
|
A good way to host your repo image is to open an issue named ASSET in your project, close it, create a comment, drag and drop the picture you want to use and that's it. You have a link that you can replace in the ``README.md``.
|
|
While you are at it submit this image as *social preview* in your repos github page's settings so that when you share on
|
|
Twitter or Reddit you don't get your GitHub profile picture to show up.
|
|
|
|
## Disable linting and formatting
|
|
|
|
### Disable Prettier
|
|
|
|
[Prettier](https://prettier.io) is opinionated, it is OK to want to break free from it.
|
|
|
|
Remove these ``package.json``'s ``scripts``:
|
|
- ``_format``
|
|
- ``format``
|
|
- ``format:check``
|
|
|
|
Remove these ``package.json``'s ``devDependencies``:
|
|
- ``prettier``
|
|
- ``eslint-config-prettier``
|
|
|
|
In the ``package.json``'s ``lint-staged`` field remove ``"*.{`s,json,md}": [ "prettier --write" ]``
|
|
|
|
From ``.eslintrc.js``, remove the line: ``"prettier/@typescript-eslint",``.
|
|
|
|
Delete these files:
|
|
- ``.prettierignore``
|
|
- ``.prettierrc.json``
|
|
|
|
In ``.github/workflows/ci.yaml`` remove the line ``- run: npm run format:check``.
|
|
|
|
### Disable Eslint and Prettier altogether
|
|
|
|
Remove these ``package.json``'s ``scripts``:
|
|
|
|
- ``_format``
|
|
- ``format``
|
|
- ``format:check``
|
|
- ``lint:check``
|
|
- ``lint``
|
|
|
|
Remove these ``package.j`on``'s ``devDependencies``:
|
|
- ``prettier``
|
|
- ``eslint-config-prettier``
|
|
- ``eslint``
|
|
- ``@typescript-eslint/parser``
|
|
- ``@typescript-eslint/eslint-plugin``
|
|
- ``husky``
|
|
|
|
Remove the ``lint-staged`` and ``husky`` fields from the ``package.json``.
|
|
|
|
Delete these files:
|
|
- ``.prettierignore``
|
|
- ``.prettierrc.json``
|
|
- ``.eslintignore``
|
|
- ``.eslintrc.js``
|
|
|
|
Remove these lines from ``.github/workflows/ci.yaml``:
|
|
- ``- run: npm run lint:check``
|
|
- ``- run: npm run format:check``
|
|
|
|
## Disable CDN build
|
|
|
|
### Completely disable
|
|
|
|
If your project does not target the browser or if you are not interested in offering CDN distribution:
|
|
|
|
- Remove all ``cdn:*`` npm scripts and ``npm run cdn`` from the `build` script ( in ``package.json`` ).
|
|
- Remove ``./tsconfig.esm.json``
|
|
- Remove ``/dist/esm/`` entry from ``files`` in ``package.json``
|
|
- Remove ``simplifyify`` and ``terser`` from dev dependencies.
|
|
|
|
### Only disable ES Module build ( ``dist/zz_esm/*`` )
|
|
|
|
If ``npm run build`` fail because ``tsc -p tsconfig.esm.json`` gives errors you may want to remove the ESM
|
|
build but keep the ``bundle.js`` and ``bundle.min.js``. To do that:
|
|
|
|
In ``package.json`` replace theses ``scripts``:
|
|
|
|
```json
|
|
{
|
|
"cdn:bundle:.js": "simplifyify dist/index.js -s #{REPO_NAME}# -o dist/bundle.js --debug --bundle",
|
|
"cdn:bundle:.min.js": "terser dist/bundle.js -cmo dist/bundle.min.js",
|
|
"cdn:bundle": "npm run cdn:bundle:.js && npm run cdn:bundle:.min.js",
|
|
"cdn:esm": "tsc -p tsconfig.esm.json",
|
|
"cdn": "npm run cdn:bundle && npm run cdn:esm",
|
|
}
|
|
```
|
|
|
|
By theses ones:
|
|
|
|
```json
|
|
{
|
|
"cdn:.js": "simplifyify dist/index.js -s #{REPO_NAME}# -o dist/bundle.js --debug --bundle",
|
|
"cdn:.min.js": "terser dist/bundle.js -cmo dist/bundle.min.js",
|
|
"cdn": "npm run cdn:.js && npm run cdn:.min.js",
|
|
}
|
|
```
|
|
|
|
Remove the ``/dist/zz_esm/`` entry from ``package.json``'s ``files``.
|
|
|
|
Remove ``tsconfig.esm.json``. ( file at the root of the project )
|
|
|
|
Edit the ``README.md`` to remove instructions about how to
|
|
import as ES module.
|
|
|
|
## Remove unwanted dev dependencies
|
|
|
|
Dev dependencies that are not required by the template ( you can safely remove them if you don't use them ):
|
|
|
|
- ``evt``
|
|
- ``@types/node``
|
|
|
|
Must keep:
|
|
|
|
- ``typescript``
|
|
- ``denoify`` ( for the script that moves dist files to the root before publishing )
|
|
- ``simplifyify`` ( for CDN build )
|
|
- ``terser`` ( for CDN build )
|
|
|
|
## Customizing the Badges
|
|
|
|
You can use [shields.io](https://shields.io) to create badges on metrics you would like to showcase.
|
|
|
|
# Accessing files outside the ``dist/`` directory
|
|
|
|
The drawback of having short import path is that the dir structure
|
|
is not exactly the same in production ( in the npm bundle ) and in development.
|
|
|
|
The files and directories in ``dist/`` will be moved to the root of the project.
|
|
|
|
As a result this won't work in production:
|
|
|
|
``src/index.ts``
|
|
```typescript
|
|
import * as fs from "fs";
|
|
import * as path from "path";
|
|
|
|
const str = fs.readFileSync(
|
|
path.join(__dirname,"..", "package.json")
|
|
).toString("utf8");
|
|
```
|
|
|
|
Because ``/dist/index.js`` will be moved to ``/index.js``
|
|
|
|
You'll have to do:
|
|
|
|
``src/index.ts``
|
|
```typescript
|
|
import * as fs from "fs";
|
|
import * as path from "path";
|
|
import { getProjectRoot } from "./tools/getProjectRoot";
|
|
|
|
const str = fs.readFileSync(
|
|
path.join(getProjectRoot(),"package.json")
|
|
).toString("utf8");
|
|
```
|
|
|
|
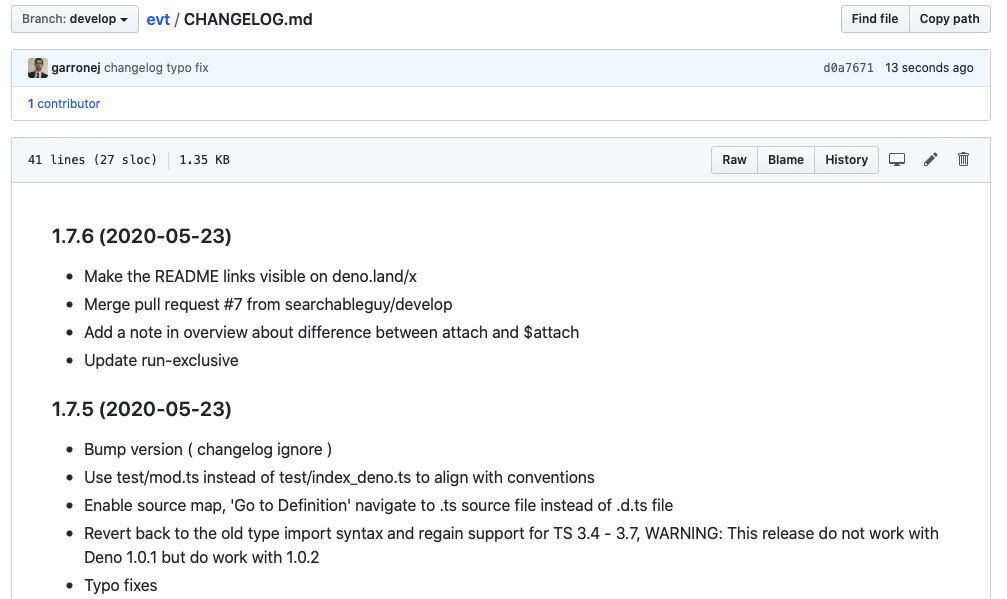
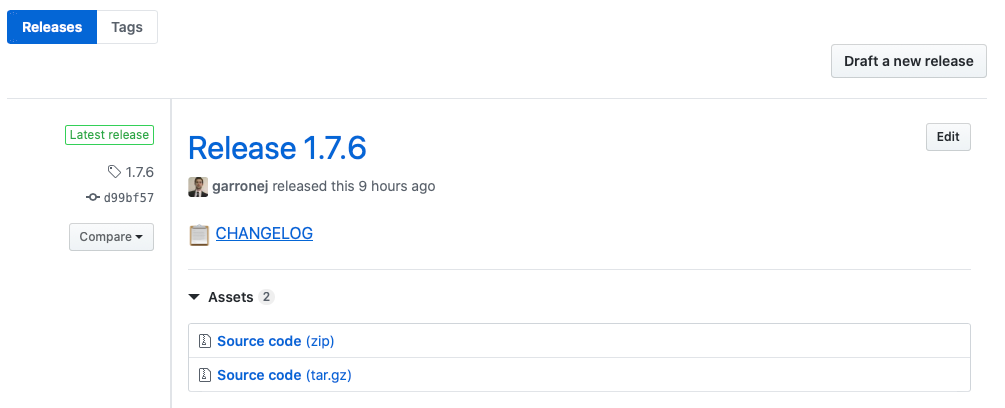
# The automatically updated ``CHANGELOG.md``
|
|
|
|
Starting from the second release, a ``CHANGELOG.md`` will be created at the root of the repo.
|
|
|
|
*Example:*
|
|
|
|
|
|
The ``CHANGELOG.md`` is built from the commits messages since last release.
|
|
|
|
Are NOT included in the ``CHANGELOG.md``:
|
|
- The commit messages that includes the word "changelog" ( non-case sensitive ).
|
|
- The commit messages that start with "Merge branch ".
|
|
- The commit messages that with "GitBook: "
|
|
|
|
*The GitHub release will point to a freezed version of the ``CHANGELOG.md``*:
|
|
|
|
|
|
# Video demo
|
|
|
|
[](https://youtu.be/Q5t-yP2PvPA)
|
|
|
|
# Examples of auto-generated readme
|
|
|
|

|
|
|
|
# Creating a documentation website for your project
|
|
|
|
I recommend [GitBook](https://www.gitbook.com), It enables you to write your documentation in markdown from their
|
|
website and get the markdown files synchronized with your repo.
|
|
They will provide you with a nice website for which you can customize the domain name.
|
|
All this is covered by their free tier.
|
|
|
|
Example:
|
|
- [repo](https://github.com/garronej/evt)
|
|
- [GitBook documentation website](https://docs.evt.land)
|
|
|
|
I advise you to have a special directory at the root of your project where the markdown documentation files
|
|
are stored. It is configured by placing a ``.gitbook.yaml`` file at the root of the repo containing, for example:
|
|
``root: ./docs/``
|
|
|
|
PS: I am not affiliated with GitBook in any way.
|
|
|
|
# Creating a landing page for your project
|
|
|
|
Beside the documentation website, you might want to have a catchy landing page to share on social networks.
|
|
You can use [GitHub pages](https://pages.github.com) to host it.
|
|
|
|
If you like the landing page of EVT, [evt.land](http://evt.land), you can fork the [repo](https://github.com/garronej/evt.land) and adapt it for your module.
|
|
|
|
To produce high quality GIF from screen recording that remain relatively small checkout the wonderful [Gifski](https://gif.ski) from [Sindre Sorhus](https://github.com/sindresorhus).
|
|
|
|
Once your page is ready you'll just have to go to settings and enable Pages yo put it online.
|
|
|
|

|
|
|
|
And update your DNS:
|
|
|
|

|
|
|
|
I personally use [Hurricane Electric](https://dns.he.net) free DNS servers because they support a lot of record types.
|
|
However, if your DNS provider does not support ``ALIAS``, you can use ``A`` records and manually enter the IP of GitHub servers.
|
|
I let you consult the [GitHub Pages Documentation](https://help.github.com/en/github/working-with-github-pages/managing-a-custom-domain-for-your-github-pages-site#configuring-an-apex-domain).
|